a pyramid in the middle of the desert
This campaign was originally run in Sheboygan in the mid 80s, and is based on the Basic D&D module B4 (The Lost City) by Tom Moldvay. I ran it again during the first part of 2016 using Advanced Dungeons & Dragons First Edition for the now-defunct Milwaukee Traditional Gaming group on Meetup; see this campaign summary for background information from that campaign. In early 2017, I resumed it using Castles & Crusades rules; this is a summary of that campaign. We stopped playing in February 2018 when two players moved out of town; if you're interested in seeing the campaign start up again, you can contact me: cenbe at protonmail dot com. This is what I have in mind...
The scenario in Father Schmerz' torture chamber was run as a standalone module called "Into the Temple of Zargon" at Nexus Game Fair 2017, and the battle in granny's root cellar ("The Last of the Zargonites") was run at Midwinter Gaming Convention 2018 in Milwaukee, both using Castles & Crusades rules.
The story begins where the previous campaign (which played through the original module) ended. Our new characters, who live in a sleepy little town called Reedle, have taken up the adventuring life, and gained some local fame by uncovering the sinister secret behind the cult of The Faceless One. As a result, they were approached by traders who had a job for them: they are to find out what happened to a caravan of theirs that was crossing the desert, but was lost without trace. The party was approached for this job because friends of theirs are known to have taken passage on that caravan, giving them an incentive to find out what happened.
After several days' travel and a lot of searching, the group finds the ruins of a city in the middle of the desert. "I knew it!", exclaims the caravan leader. "A bandit hideout! I'll bet our stuff is in there somewhere!" They make camp and tell the party that they'll wait three days for their return, refusing to enter the ruins themselves.
In the ruins, the party finds the top of a step pyramid half-buried in the sand, and a secret entrance in the side of the pyramid's steps is quickly located. Entering, they negotiate several traps, only to find that the pyramid is guarded by white-skinned fighters wearing an unfamiliar symbol: a sword crossed by a wand and a sheaf of wheat. After a brief discussion, they offer to take the party to Pandora, one of their leaders, in their underground city. Pandora, it turns out, has left instructions to bring any "pink‑skins" who might enter the pyramid to her.

Travelling through the interior of the deserted pyramid and eventually entering a winding passageway cut through solid rock, the party and their escorts travel for hours before the passage widens, opening into a huge cavern with an entire city in it! To the west is a plateau of mud geysers [area P] and even a volcano [area Q]. There's a lake in the center with a mist-covered island on it [area B], a strange mushroom forest to the south [area I], and the city of Cynidicea to the east. To the north are well-kept fields of mushrooms and corrals holding giant locusts [areas F and G], all being tended by workers.
The party is escorted through the city down a wide street in its center as its white-skinned inhabitants gape at their strange coloration. But before they can reach their destination, a dozen very different fighters ambush them and attack! They wear masks depicting a tentacled head with a horn on it, and appear to be crazed or drugged! The escort implores the party to retreat, but our valiant heroes are not to be deterred from what they do best, and batter the fighters into submission, their magically-inflicted blindness causing them to stumble into buildings as they withdraw. But even as they run from the combat, the strange-looking fighters defiantly shout "Zargon Lives! Abundance! Abundance!"
Reaching the Temple of the Trinity [area K], they are led to a richly appointed room in which they see Pandora, seated, affectionately petting a large wolf. Beside her stand an old woman with her hair in beaded dreadlocks (Latild) and a powerful but world-weary looking man in a blue robe (Kanadius). A group of fighters is also present. Pandora asks the party what has brought them to Cynidicea, and when the party describes their lost friends, there are gasps in the room as she says "The Chosen Ones! And the gods have seen fit to send us new Chosen Ones!" Although somewhat taken aback by this, the party listens to her story (see previous campaign summary) and realizes that there is much good they can do here in addition to finding out the fate of their friends. The original "Chosen Ones" vanished under mysterious circumstances; the Cynidiceans believe them to have gone off on their own for some unknown purpose. The three factions of Cynidicea have been united into what they call the Trinity, worshiping the three gods equally as in the olden times. The illusionists of Usamigaras, suspected of having been in league with the Zargonites, are to be disbanded, and they are to give up their magic. In the meantime, they will use nothing but healing spells, to help those trying to break free of the addiction to Crevulax. Latild has begun training a new group of Usamigarans, who are to be true wizards. Zargon is indeed dead, Pandora says, having seen the carcass herself, and his priests and fighters had to be executed after interrogation, as they were beyond redemption. However, there is one renegade priest left who must be dealt with. Pandora asks the party for their help with this, as her people are busy rebuilding the city, and sadly, distributing regular supplies of what Crevulax remains to the addicted populace. Obviously no more of it will be made, but that is another problem for another time.
The party finds the renegade priest Malzor in his chapel of Zargon, in the root cellar of a little old lady. After a fierce battle (13 rounds), Malzor and his fighters are no more. But with his dying breath, Malzor says "There is one greater than Zargon who will come; one whose formlessness I am not worthy to touch! Abundance! Abundance!" The Zargonites had been holding a prisoner, and it turns out to be the missing Auriga, leader of the illusionists of Usamigaras! Auriga confesses that it was he who betrayed Kanadius and the Madaruan fighters to Father Schmerz, but that he did it under duress. Malzor held his daughter hostage, but had offered to return her to him, reaching into his robes for something just as the battle began. Searching Malzor's body, the party finds a small vial, which Auriga identifies as Crevulax: all that remains of his daughter. Falling to the floor, he weeps uncontrollably, blaming himself for her horrible death. Now, like Kanadius before him, he has become a broken man.
The party returns to Pandora, who rewards them with magic items looted from the former Temple of Zargon (now the Temple of the Trinity), suggesting that they may be needed in their next endeavor. Auriga is to be debriefed by Latild. But first, it's time to celebrate! Pandora has organized a fun fair to celebrate the people's liberation from the unspeakable evil of Zargon, and the Chosen Ones are her honored guests! The plentiful food and good company are disturbed by a petulant child on the cave locust ride, whose mount panics. Rescuing her, Sprocket the illusionist is noticed by a bystander who engages him in a mysterious conversation...
The next day, Pandora brings the party up to speed on what has been found since they took over the former Temple of Zargon: Father Schmerz' quarters have been located, and some writings there seem to confirm what was learned from interrogating the Zargonite priests: he regularly traveled to the sinister Island of Death to deliver Crevulax! In fact, a secret door was found in his torture chamber that leads underground in the direction of the island. Only one person can help with further information, Pandora says, and a meeting with Orpheus the 'shroom druid is arranged.
A strange young man in a robe and cowl approaches the party, introducing himself as Orpheus' apprentice, Ardax. Although he leads them through a secret entrance into Orpheus' mushroom forest [area I], he toys with them, repeatedly disappearing after calling out "Right this way!". But the party successfully negotiates the guards and tests in this strange place, and are eventually welcomed by Orpheus, who scolds his young apprentice and sends him off to do his chores. He then shares the origin of Zargon with them.
Many years ago, Orpheus and his friend Calais took up study of the esoteric arts, Orpheus with the priestesses of Madarua, and Calais with the wizards of Usamigaras. Oh yes, says Orpheus, they were originally wizards and not illusionists. But both young men became dissatisfied with the teachings they were receiving. Orpheus, frustrated by the fact that only women can become clerics of Madarua, retired to his mushroom forest to teach himself the ways of a druid. But Calais, dissatisfied with the pace of his education, wandered outside the city's cavern into the endless depths of the Darkworld, returning as a powerful illusionist. How he acquired this teaching, Orpheus does not know, but Calais' illusions attracted the attention of the Usamigarans, and later, he began learning to create horrible aberrations in real life, one of which escaped his laboratory in the city and endangered the Cynidiceans. The Usamigaran wizards had had enough, and tried to drive him out of the city, but were amazed to see him swim to the Island of Death and disappear into the mists. Against their better judgement, a few of them managed to follow him there, but were never seen or heard from again. Shortly afterward, a mysterious figure appeared to the Usamigarans and started a new cult, this time based on illusionist magic. Orpheus sadly says that his boyhood friend Calais then created Zargon and loosed him on the city so he wouldn't be disturbed in his further experiments. He even created a fake priesthood around the worship of this abomination. How the Zargonite priests gained spellcasting abilities, Orpheus does not know, but Zargon was certainly not a god. And if Father Schmerz was carrying Crevulax to the island, he says, it's likely that Calais was involved with the drug as well. There must be some information on the island! Although Orpheus will not accompany them, he encourages the party to pass through Schmerz' secret passage in an attempt to reach the Island of Death underground.
During the party's discussion with Orpheus, they couldn't help but notice Ardax' dark skin, and ask Orpheus about it discreetly after Ardax has left. Orpheus tells them that Ardax is half-Drow, although he's not aware of the fact. Orpheus declines to discuss the boy's parentage. As they continue to talk, a small animal runs up to Orpheus with a rolled-up piece of mushroom skin on which is written "I've gone to find my true heritage! I want to discover my own people!" Clearly, Ardax had been eavesdropping and heard Orpheus tell the party that he is half-Drow. Orpheus, who says that he can't leave the mushroom forest, convinces them to rescue Ardax from the Drow. They find him with a small Drow hunting party, and although he is initially reluctant to come back, the death of a Drow spellcaster makes it apparent that he had been Charmed by them. When they return, he tells them with a shudder how utterly alien they were to him. It seems clear that he's had enough of "finding his true heritage"!
In search of a cure for the Crevulax addiction that the Cynidiceans suffer from, the party enter the secret door in Father Schmerz' former torture room and follow a winding passage under the lake to the Island of Death. There they meet Calais himself, who is obviously quite mad. He shows them a room with a glass wall looking out into the water under the surface of the lake, and an aboleth swims up to it to communicate with him. The party catches Calais off-guard and engages him, eventually forcing him to flee through a Gate, while their rogue makes off with Calais' lab notes on a possible cure, which must be found at the Temple of Ghaunadaur. Back in the city, Pandora risks all by introducing the party to her lover Alak (father of Ardax), a Drow spy loyal to Lolth who has infiltrated the Ghaunadaur worshippers. He has no scruples about betraying the temple's location, and after the party fight a Drow priest and his guards, they find the fabled Night Lotus, source of the cure for Crevulax addiction! Descending beneath the temple, the party finds a laboratory containing the secret of how to use the Night Lotus to make the antidote. Unfortunately, the lab also hid the entrance to an aboleth's lair, and two of our brave adventurers ended up as water breathers. But one of the prisoners in the aboleth's lair is a powerful wizard: one of the original Usamigaran mages! Having been on the slave gang that created an underwater passage leading away from the Temple of Ghaunadaur, the wizard reveals that it leads to an exit in the underground city's lake, and the decision is made to travel through it. Sure enough, it opens on the bottom of the lake at the edge of the Island of Death. With this landmark, the party is able to find their way to the sandy beach at the edge of Orpheus' mushroom forest and convince him to Heal the water-breathers. Orpheus is very excited to receive the Night Lotus and the antidote recipe, and gets right to work.
The party goes to brief Pandora and the other leaders, but while they're there, Ardax comes with a message: Orpheus needs to see them most urgently, and he wants Pandora to come along! Pandora is surprised by this, since she and Orpheus have not spoken since their falling out over her affair with Alak the Drow. When they meet, though, he tells her they must put all that aside, and they embrace warmly. But something terrible has happened: Ardax detected the Ghaunadaur worshippers entering the 'shroom forest, and they made away with the Horn of Zargon, which Pandora had given to Orpheus for safe keeping after the original Chosen Ones killed Zargon. Slippery Sam says that he found a book in Calais' stronghold on the Island of Death that mentions Zargon, and gives it to Orpheus to study. What Orpheus finds out shocks them all to the core: Zargon could regenerate from his horn! The only way to destroy it is to throw it into the volcano on the Plateau of Mud and Geysers, which is known as The Eye of Zargon. But first they must retrieve it from the Ghaunadaur worshipers!
An expedition is hastily assembled, and the party returns to the Temple of Ghaunadaur, finding it deserted and sealed by a brownish wax-like substance bearing the glyph of Lolth. The party decides to scout out the cave where the Ghaunadaur worshipers live, and they find it mostly deserted as well... except for a small building from which are heard blood-curdling screams and shouts of "Abundance! Abundance!" As this can mean only one thing, they assault the building, and sure enough, find a Drow cleric and a group of fighters drilling the skulls of some unfortunate Lolth worshipers, clearly to make the abominable drug Crevulax! All are put to the sword, and a large statue of Zargon is found to have a very real horn, which is retrieved and returned to Cynidicea. But for whom were the Drow making Crevulax?
Now the Plateau of Mud and Geysers must be braved, and no one in recorded memory has gone there. Every possible route to the plateau is dangerous: the cliffs to the north are inhabited by monsters, the lake has its own denizens (and a powerful current that may pull them to an uncertain fate), and the area leading to the rock bridges over the chasm at the southwest of the great cavern has been shunned since an unknown disaster long ago. There is precious little Orpheus can do to advise the party, so they climb the hill west of the 'shroom forest and advance through the empty buildings toward the rock bridges. This area turns out to be inhabited by bizarre undead creatures, but the party eventually dispatches or turns them. The rock bridges are safely traversed despite the appearance of a huge squid-like creature in the waters below, and the plateau holds its own dangers: bubbling mud pools, geysers of scalding steam, and more. Fionna the cleric casts Endure Elements and Wind Walk to reach the top of the volcano with the Horn, while the other brave adventurers hang back from the dangers of the plateau. As she reaches the edge, an efreeti and some salamanders appear, but she throws the Horn into the volcano. The efreeti, however, jumps for it and grabs it! The other adventurers come to her rescue and a battle ensues in which the elemental creatures are destroyed. Once more the Horn is thrown into the volcano, and it spirals slowly into the blazing crater like water down a drain until it nears the bottom... where a fiery hand reaches up and grabs it with a hideous, cruel laugh! Now what? Returning to Orpheus, they are unsettled by his seemingly offhand remark that "there are way too many portals to the elemental planes around here"...
In order to find out what has happened to the Horn, Pandora casts a Commune spell, and with the help of Orpheus and Latild (who know something of these matters), Pandora is able to ask specific enough questions for the party to determine that the Horn is indeed on the Elemental Plane of Fire, held in the efreet's City of Brass. The Cynidiceans give the party a large amount of fiery-colored gems to negotiate with, and after further discussion, it is determined that they have the necessary protections to travel there. Following the Horn through the planar vortex at the bottom of the volcano on the Plateau of Mud and Geysers seems unacceptably risky, so the decision is taken for Pandora to cast Plane Shift, which she has never before attempted. When the spell is cast, the party arrives in a sea of molten lava, and is horrified to see that Pandora has travelled there with them: apparently she didn't realize that she would also be transported. Since she is unprotected, Fionna immediately casts Dismissal to return her to her own plane, but the damage is done and although she survives, Pandora has been seriously burned.
The party is able to "swim" to a shore they can see ahead of them, although they quickly realize that navigation on an Elemental Plane is uncertain at best. Arriving on a vast plain of black ash, they see a small basalt building and enter it, finding two statues: one is an azer holding a stoppered bottle, and the other is vaguely man-like. Slippery Sam takes the bottle from the azer statue, and the other awakens: it's a basalt golem, programmed to protect the bottle! A strange battle ensues as Sam opens the bottle, releasing an efreeti whom he commands to attack the golem. Even with its help the golem seems invincible, though the party is able to escape with the bottle, to which the efreeti returns after its short period of service.
Having learned from the bound efreeti that their basalt ships sail the lava sea, the party is able to hail one and bargain for passage to the City of Brass, where a Locate Object spell reveals that the Horn is in the chambers of an efreeti lord. Using every skill at their disposal, the party is ushered into his presence, where they negotiate for the return of the Horn. Although the negotiations are not entirely smooth, the efreeti becomes completely smitten with Svenska (between her natural beauty and the effects of the Armor of Kavacha). Although the entire bag of gems is used, the efreeti agrees not only to return the Horn, but to transport them back to their own plane. One gem he returns to Svenska, burning into it with his fiery fingernail the magical runes 867-5309 as he whispers "call me". On their return, the grateful Cynidiceans decide to store the Horn in one of the three statues on top of the pyramid... along with the treasure put there by the original Chosen Ones, which is where the gems came from. The matter of Zargon's possible regeneration from his horn, though, has not been addressed...
Although most of the Cynidiceans have by now been cured of their Crevulax addiction and the Horn of Zargon is safe (for the moment), all is not rosy in The Lost City. Once again Pandora asks the party to meet with her lover Alak the Drow, and he has some disturbing news for them. Although their two encounters with the Ghaunadar-worshiping faction among the Drow ended in victory, the remnant of that splinter group is determined to snatch victory from the jaws of defeat, and Alak's spies have found that they plan to attack the City. Worse yet, the Drow leadership has become aware of the Chosen Ones and the threat they may pose to the greater Drow community. Alak, ever the secret diplomat, suggests that if the Cynidiceans were to decisively defeat the Ghaunadaur worshipers, the Drow leaders might be persuaded to lose their concerns and hope that their longstanding detente with the other races in the Darkworld can be maintained. To that end, he lets the party know that there are Drow spies in Cynidicea. The only clue he has to their whereabouts is a nonsense phrase that he cannot understand: "granny's basement". The party, of course, knows exactly what is meant, and travels to the site of their battle with the last of the Zargonite priests, finding the two spies and engaging them. Unfortunately, one of them casts Dragon Mount and escapes. While the party uses Speak With Dead on his unfortunate companion, a terrific commotion is heard outside... the siege of Cynidicea has begun!
Using the Castles & Crusades mass combat rules, a battle with ten five-man squads of Drow fighters is begun, with six infantry and four archer units fighting from the Citadel of Gorm. Even though ten squads of the Warrior Maidens of Madarua arrive in round seven, the battle still rages for 13 rounds before a single ragtag squad of Drow escape to tell of their defeat. One can only imagine the fate that awaited them upon their return...
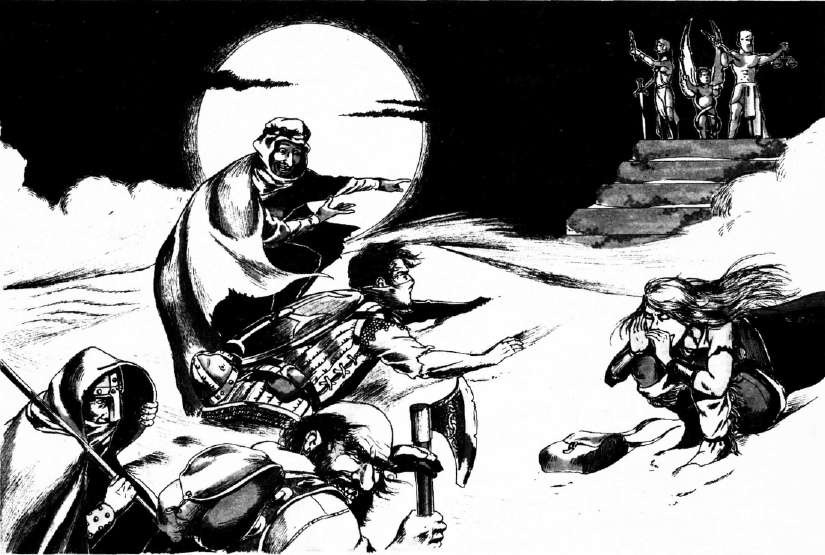
The Chosen Ones are invited to an elegant dinner party with Pandora, where she proudly tells them that all of her people have now received the antidote to Crevulax. But the mood is soured when one of her warrior maidens brings in a guard from the upper entrance to the pyramid, who is in a terrible state. "I saw it... straight out of hell!", the terrified man says. "Half octopus, half lizard, with long tentacles and a big black horn sticking out of its forehead..." It couldn't be! Zargon? What was it that Orpheus said about the possibility of his regeneration from the horn alone? And the horn had been stored with the Chosen Ones' treasure in the statues on top of the pyramid! If it's true, then under no circumstances can Zargon be allowed to return to the city and terrorize the people again. So once more unto the breach, the Chosen Ones go up through the pyramid to the statue tubes, where they discover terrible carnage and a hideous trail of slime that can mean only one thing. Searching through the pyramid, they eventually discover the abomination itself, and a battle begins. Despite his power, Zargon proves no match for our mighty heroes, and he is brought down again. This time, his evil black horn is given to Latild, and at a great festival in the city, the horn is placed upon a pedestal, where before all the people of Cynidicea, she stretches forth her hand... and casts Disintegrate! The Horn of Zargon is no more, and the people of Cynidicea are finally and totally free!
Now that the Cynidiceans are able to rebuild their civilization, the party has decided to move on. As they leave the City, they are accompanied by Pandora, Kanadius, and Latild, who summons Driller to close all the tunnels between the pyramid in the desert and the Lost City below. A new journey begins as the party finally reaches their predecessors' original destination, "The Outpost on the Edge", where the paper wrapping some trinkets is discovered to contain a treasure map, leading to a sea voyage to Ierendi.
What will the future hold for the Chosen Ones?
Following their supposed treasure map, the Chosen Ones enter into the jungles of Ierendi, fighting off hostile natives as they go. After some time they find the skeleton of an unfortunate adventurer, near a tree that has a piece of parchment nailed to it with a jewelled dagger. The note describes a journey to find the riches pictured on the map, but says that they are not what he expected to find. He was searching for the ancient civilization of the Kepta people, who could be reached by magical travels through tunnels beneath the mountains, at either end of which were great cities.
Following the map further, the party reaches impassable cliffs at the edge of the mountains and realizes that whatever city might once have existed there had been covered in volcanic lava a very long time ago. But they stumble across a magic mouth that reveals the entrance to a passage leading to a ledge high up on the cliff face. Turning a corner, they see more of the natives they fought in the jungle, leading to a deadly fight in which dozens of them are exterminated by the party's powerful magic. Proceeding further into the mountains, a stairway is discovered that leads back down through the rock into the very heart of the mountain. There they find strange rooms with magical devices and symbols in them. What does it all mean?
to be continued...